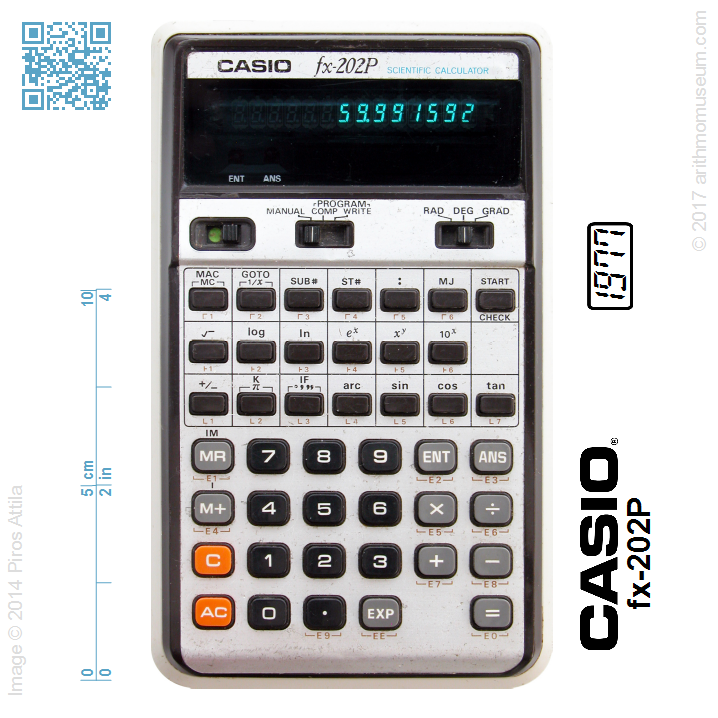
Casio fx-202P
Casio's first three scientific programmable calculators are roughly the same: they have 127 steps of program storage; 1 independent, 10 storage and a indirect address registers. The program can be checked on the display, but the instruction codes are not numbered according to the usual row-column identification: the codes for each key — which contain numbers and some symbols that can be generated on seven-segment displays —, are labeled on the keyplate. Due to the dual function of some keys, certain functions cannot be used in a program: for example, recalling pi, or the reciprocal function. The fx-201P forgets the entered program when it is turned off, while the fx-202P retains the contents of its memory thanks to two extra button cells; and the PRO fx-1 can record programs on magnetic cards. Another characteristic of the machines is that, despite the Japanese design, they are unusually large, so they can be considered as hand-held machines instead of pocket calculators.
| Manufacturer: | CASIO Computer Co., Ltd. (Japan) |
| Mfg. date: | 1977-78 |
| Size: | 10,2×17,1×3,2 cm |
| Weight (ready for operate): | 379 g |
| Type: | programmable scientific |
| Capacity: | 10/8+2 digits (input) 10/8 (7)+2 digits (display) 10+2 digits (internal precision) |
| Operating logic: | algebraic |
| CPU: | Hitachi HD36136 + HD36106 + HD37603 |
| Registers: | 2 standard (with saving the pending operation) 1 constant (with saving the pending operation) 11 memory (with aritmetic) |
| Features: | +/-change sign (direct entry of negative numbers) Ffloating-point notation Sciscientific (exponential) notation Sqrsquare root pivalue of pi (3.1415..) can be recalled 1/xreciprocal trigtrigonometrical functions (sin, cos, tan and inverses: arcsin, arccos, arctan) DMS-DDconversion of decimal and sexagesimal numbers logexponential and logarithmical functions (10- and e-base) yxraising to power |
| Display: | 14 digit VFD (Toshiba E6543) |
| Power: | 4×AA + 2×LR44 battery AD-4145 adaptor |
| Programming method: | keystroke-programmable |
| Program capacity: | 127 keystrokes |
| Test results: | trigonometry:result of sin-1(cos-1(tan-1(tan(cos(sin(60°)))))), reference value: 60. 59.991592 exponential:result of 0.999160000, reference value (first 14 digits): 3.0068804206375×10-70 3.0068804E-70 |
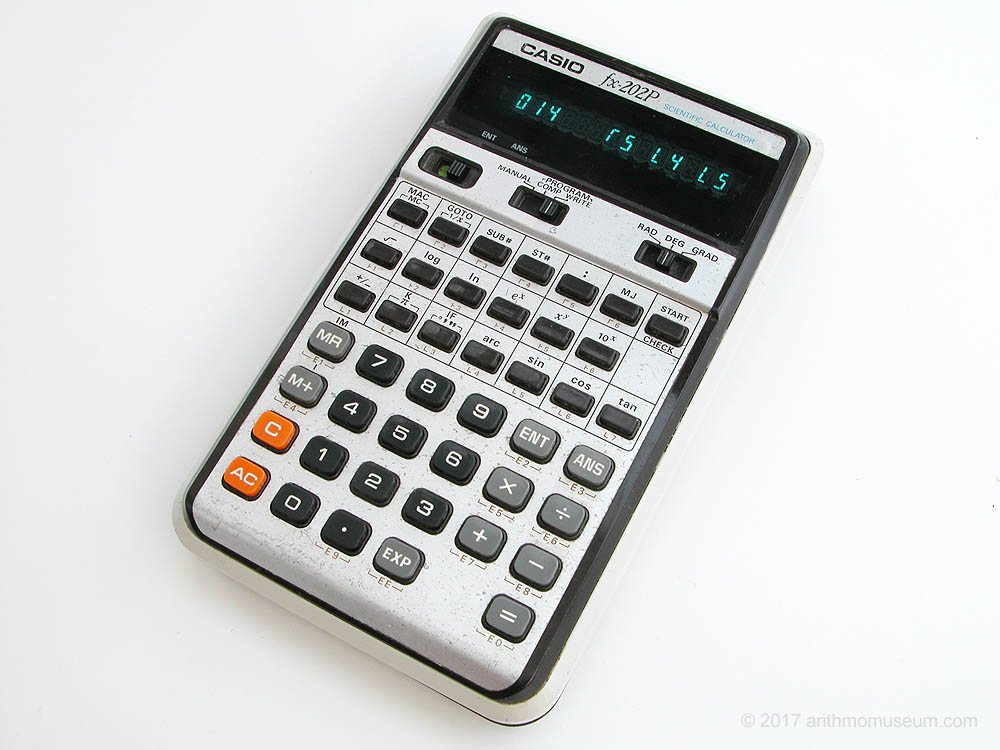
fx-202P
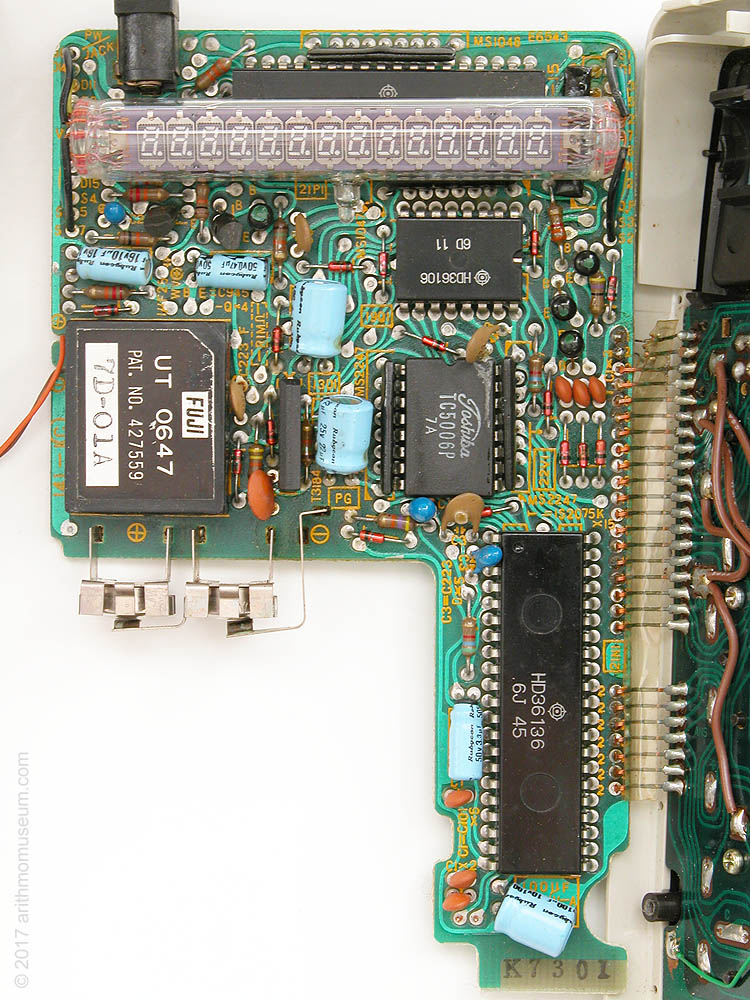
Inside of the fx-202P
Using the calculators
The calculator can be used in three operating modes, which can be set with the mode selector slide switch:- MANUAL: In this mode, the machine can be used as an ordinary scientific calculator, the entered program cannot be run.
- PROGRAM COMP: mode for running the entered program.
- PROGRAM WRITE: mode for entering, checking and changing the program.
In PROGRAM WRITE mode you can write or modify a program. In this case, the display shows the current (displayed) program step number on the left, and the instruction code of that on the right. The other two codes represents the previous two instruction codes to the current program step. The instruction codes are not coded according to the row-column scheme, but follow the arrangement of the keys: the first digit represents the key group, and has a special symbol that can be displayed on the seven-segment display; the second digit represents the place within that group. The numeric keys are represented with their values. Below each key, its instruction code has been printed for easier identification.
The programming model is unusual, using certain elements of high-level languages of computers. The program consists of instructions that must be closed with a colon :.
The instructions are as follows:
n = expression The value assignment is not in the usual way for calculators, but is similar to programming languages: on the left side of the equal sign is the number of the target register (0..9), and on the right side is the expression that the machine to calculate. It is important that the registers can only be referenced by their number, it is mandatory to press the K key before constant values! The term 3 + 6 adds the value of register 3 and register 6; the desired 3 + 6 addition can be specified on these machines with the K 3 + K 6 key sequence. It is important that the machine does not follow the hierarchy of operations, so the expressions are executed strictly from left to right. E.g. 3 = 6 × K 3.2 instruction stores 3.2 multiplied by the contents of register 6 to register 3.
ENT n Input instruction. Stores the value entered at run-time in the corresponding register. The program will stop running, the number of the register to be input will appear on the left side of the display, and the ENT lamp will light. After entering, the program can be resumed by pressing the ENT key. You can request data from multiple registers at the same time with using the colon. E.g. ENT 3 : 4 : IM statement requests data for the 3rd, 4th and the IM registers, respectively.
ANS n Display instruction. The contents of the specified register are displayed and program is paused until the ANS key is pressed. Similar to the ENT instruction, the ANS instruction can be used to display multiple registers using the colon. E.g. ANS 3 : 7 instruction displays the contents of register 3 and then register 7.
ST# n Start of program section (label). You can add up to 10 labels to the program: the number entered after the ST# key (0 .. 9) will be the label. Conditional and unconditional jumps can transfer control to these labels. For example, ST# 7 indicates label number 7.
SUB# n Start of subroutine (label). You can add up to 10 labels to the program (together with the ST statement): the number entered after the SUB# key (0 .. 9) will be the ID of the subroutine. Conditional and unconditional subroutine calls can transfer control to these labels. There is no way to nested subroutines. For example, SUB# 8 marks the beginning of subroutine 8.
GOTO n Unconditional jump. At program run, it jumps to the label specified after GOTO. A subroutine is called in the same way; returning to the main program is automatically executed when an other SUB# instruction or the last instruction is reached. E.g. GOTO 9 instruction jumps to label 9.
MJ Manual jump. You can jump to the MJ instruction in the program by pressing the MJ key at run-time.
IF n = m : label : label : label Conditional jump (branching). The calculator continues execution based on the results of comparing the two registers specified. If the value of the first given register is less than the value of the second given register (n<m), jumps to the first specified label (subroutine); if they are equal (n=m), jumps to the second given label (subroutine); finally if the value of the first given register is greater than the value of the second given register (n>m), jumps to the third specified label (subroutine). The three labels must be specified in all cases.
I IM Indirect addressing can be used with the I and IM registers: the number of data register specified in the I register can be accessed with the data register IM, e.g. if the contents of the I register are 3, the IM register points to the data register 3, that is, ANS IM displays the value of data register 3. The contents of register I can be input in the usual way (ENT I), in which case an ’E’ symbol will appear on the left side of the display, identifying register I. The contents of register I cannot be displayed with the ANS instruction.
MAC The MAC key deletes the 10 data registers and the I-register, preferably used as the first instruction in the program.
It is important to note that since multiple keys have two functions, certain keys cannot be programmed and can only be used in MANUAL mode. These include the independent memory register keys (MC, MR, M+) and the 1/x, π, and °" keys.
The program can be checked or edited in WRITE mode: pressing the CHECK key increases the value of the program counter by 1, i.e. the next instruction (more precisely the next and the preceding two) is displayed. The displayed program step can be cleared by pressing the C key, in which case the program counter is reduced by one, i.e. the previous program step is displayed. The deleted instruction code is replaced by the code 00, which means an empty instruction. There is no way to insert new steps into the program.
In COMP mode, you can start the program from the beginning by pressing the STA key. If execution stops, the lamps indicates the reason for halt: if the ENT light is on, data must be entered in the displayed data register; if the ANS lamp is lit, the displayed data register and its contents can be read; or if none of the lights are on, the program is over. You can close the data entry with the ENT key, which resumes program execution. After the data is displayed, pressing the ANS key will resume program execution in a similar manner.
Program for factorial calculation
ENT 1 :
2 = K 1 :
3 = 2 :
ST# 1 :
IF 3 = 1 : 2 : 0 : 0 :
ST# 2 :
3 = 3 + K 1 :
2 = 2 × 3 :
GOTO 1 :
ST# 0 :
ANS 2 :
| Step | Keying | Instruction code |
| 001 | MAC | ┌1 |
| 002 | : | ┌5 |
| 003 | ENT | E2 |
| 004 | 1 | 1 |
| 005 | : | ┌5 |
| 006 | 2 | 2 |
| 007 | = | E0 |
| 008 | K | L2 |
| 009 | 1 | 1 |
| 010 | : | ┌5 |
| 011 | 3 | 3 |
| 012 | = | E0 |
| 013 | 2 | 2 |
| 014 | : | ┌5 |
| 015 | ST# | ┌4 |
| 016 | 1 | 1 |
| 017 | : | ┌5 |
| 018 | IF | L3 |
| 019 | 3 | 3 |
| 020 | = | E0 |
| 021 | 1 | 1 |
| 022 | : | ┌5 |
| 023 | 2 | 2 |
| 024 | : | ┌5 |
| 025 | 0 | 0 |
| 026 | : | ┌5 |
| 027 | 0 | 0 |
| 028 | : | ┌5 |
| 029 | ST# | ┌4 |
| 030 | 2 | 2 |
| 031 | : | ┌5 |
| 032 | 3 | 3 |
| 033 | = | E0 |
| 034 | 3 | 3 |
| 035 | + | E7 |
| 036 | K | L2 |
| 037 | 1 | 1 |
| 038 | : | ┌5 |
| 039 | 2 | 2 |
| 040 | = | E0 |
| 041 | 2 | 2 |
| 042 | × | E5 |
| 043 | 3 | 3 |
| 044 | : | ┌5 |
| 045 | GOTO | ┌2 |
| 046 | 1 | 1 |
| 047 | : | ┌5 |
| 048 | ST# | ┌4 |
| 049 | 0 | 0 |
| 050 | : | ┌5 |
| 051 | ANS | E3 |
| 052 | 2 | 2 |
| 053 | : | ┌5 |